Thursday, October 25, 2012

Halloween Craft using ZIP DRY paper glue


CANDY CORN PUMPKIN CARD

BY SANDY ROLLINGER

SUPPLIES

  • ZIP DRY PAPER GLUE
  • Creative Paperclay Delight white, www.paperclay.com
  • Candy corn decorative paper
  • Striped black decorative paper
  • Black cardstock
  • Halloween message stickers, 2
  • Clay roller, ruler, paper cutter, small scissors, small watercolor paintbrush
  • Watercolors (yellow, orange, green) 2” oval clay cutter, toothpicks, scrubby pad, plastic place
  • mat for work surface
  • Small jar of water & paper towel for brush clean up.


INSTRUCTIONS

1. Roll out a 5” square of Paperclay onto the work surface to about 1/8” thickness. Press scrubby
pad onto clay surface for texture. Cut out one oval shape for pumpkin. Use the toothpick to
make two lines as seen on pumpkin. Roll a small cone shape for the the stem. Use a toothpick to
mark lines on the stem. Glue stem to top of pumpkin. Let dry for several hours.

2. Use the paper cutter to cut out a 5” X 7” rectangle of candy corn paper and glue to the front of a
blank 5” X 7” card.

3. Cut a 2” x 7” strip of black striped paper and glue about 1” in from the left side of the card. Line
edge to the bottom of the card and fold over extra to the back of the card.

4. Place Halloween message stickers on black striped paper.

5. Use a small brush and dip in yellow watercolor. Paint pumpkin. Before paint dries, add some
orange watercolor to the side of the pumpkin for shading.

6. Paint the stem using the green paint. Add a line or two of orange paint on the stem.

7. Using the small scissors, cut a simple triangle nose, eyes & mouth from the black carstock. Glue
onto pumpkin face, and then glue the pumpkin onto the black striped paper as in photo.

Thursday, October 11, 2012

Craft Ideas Using Beacon's FABRI-TAC Glue


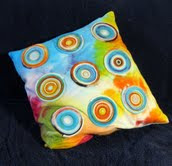
TEES PILLOW
10/22/12


SUPPLIES

  • FABRI-TAC  GLUE
  • Tie Dyed T-Shirt
  • 16” Pillow Form
  • Scissors, Sewing Machine, Needle, Thread

INSTRUCTIONS

  1. Cut two 17” squares from the body of the T-shirt and set aside.


  2. Refer to the Diagram A to cut the remainder of the T-shirt in 1” strips. Gently stretch each of the strips to form rolled fabric tubes. The Tees strips are formed as the fabric is stretched and each of the sides curls towards the center.
  3. Always cover work surface before gluing.
  4. Apply FABRI-TAC in the inside folded edge of a string and tightly wrap it around itself forming a spiral. Continue adding glue and wrapping around the Tees strip to the desired spiral size, Diagram B. Create nine 3 ½” spirals and let dry.
    1.                                                            


  5. Place one of the 17” squares right side up on a flat surface.  Arrange and mark location of spirals on the pillow front to desired arrangement. Apply glue to the back of each spiral and press into pillow front. Place a heavy object on top and let dry. See Diagram C below.
  6. With right sides together, stitch around the outside edge of the squares leaving a 6” opening along one edge. Turn right side out and press flat. Insert pillow form and hand stitch opening closed as in Diagram D below.


Diagram C:                                                                                  Diagram D:


TEES HEADBAND

BY LORINE MASON


SUPPLIES

  • FABRI-TAC GLUE
  • Tie Dyed T-shirt strips
  • Plastic hairband blank
  • Scissors
  • Photograph A


INSTRUCTIONS


  1. Refer to the diagram to cut T-shirt into 1” strips. You will need two strips to create one headband. Gently stretch each of the strips for form rolled fabric tubes. The Tees are formed as the fabric is stretched and each of the sides curls toward the center.

  2. Apply FABRI-TAC to the inside folded edge of the Tees strip and tightly wrap it around itself , forming a spiral. Continue adding glue and wrapping around the strip to create the desired size.


  3. Create three 1” & five ¾” spiral for each hairband. Refer to the photograph for wrapping spiral. Let dry.
  4. Glue to one end of the Tees strips and press to the inside edge of the headband, Hold the glued end in place while wrapping the strip around the headband, covering the glued end. Refer to the Wrapping Hairband photo.
  5. Apply glue to the hairband and continue wrapping, pressing the strips into the glue. Cover 2/3 of the hairband. Cut strip. Repeat the process starting from the opposite end of the hairband until it’s completely covered.
  6. Glue spirals to the top of the covered hairband, layering a few to create the desired look. Let dry.


Tuesday, October 9, 2012

PATCH PERFECTION!


Can I use PATCH ATTACH  on a nylon sports jacket?

Glue Gal speakls: Not a good idea! Patch Attach is a glue that is activated by a hot iron and cannot be used on nylon, leather, satin, certain synthetic blends, or shear and delicate fabrics that will either "melt" or be scorched by heat. Patch Attach is great on denim, cotton, felt, and other natural fibers.

When I opened a bottle of Patch Attach, I was surprised to find that it had no stickiness and was just a white powder. Did I get a defective bottle?

Glue Gal speaks: Patch Attach's formula is supposed to be powdery and non-sticky until it's heat set with a hot iron on a cotton or linen setting. Until heat is applied, the "magic" doesn't happen! However, once adequate heat is applied the glue is permanent, both washable and dry cleanable, and cannot be removed.

CHA WINTER SHOW 2013

CRAFT AND HOBBY ASSOCIATION WINTER SHOW, JANUARY 12-15,2013

If you're a retailer, distributor, or professional designer and intend to be at the CHA Winter Show in Anaheim,CA next year, please stop at Beacon's booth # 2337 and join us for a few minutes to see what's new and to do some fun make-take projects. We have great make-takes planned along with a few surprises. We'll be posting a lot more information as we get closer to the show.

Sunday, October 7, 2012

Candy Corn Pumpkin Card

By Sandy Rollinger


SUPPLIES
  • Zip Dry Paper Glue
  • Creative Paperclay Delight white, www.paperclay.com
  • Candy corn decorative paper
  • Striped black decorative paper
  • Black card stock
  • Halloween message stickers, 2
  • Clay roller, ruler, paper cutter, small scissors, small watercolor paintbrush
  • Watercolors (yellow, orange, green) 2" oval clay cutter, toothpicks, scrubby pad, plastic place mat for work surface
  • Small jar of water and paper towel for brush clean up
INSTRUCTIONS

1. Roll out 5" square of Paperclay onto the work surface to about 1/8" thickness. Press scrubby pad onto clay surface for texture. Cut out one oval shape for pumpkin. Use toothpick to make two lines as seen on pumpkin. roll a small cone shape for the stem. Use a toothpick to mark lines on the stem. Glue stem to top of pumpkin. Let dry for several hours.

2. Use the paper cutter to cut out a 5"x7" rectangle of candy corn paper and glue to the front of a blank 5"x7" card.

3. Cut a 2"x7" strip of black striped paper and glue about 1" in from the left side of the card.

4. Place Halloween message stickers on black striped paper.

5. Use a small brush and dip in yellow watercolor. Paint pumpkin. Before paint dries add some orange watercolor to the side of the pumpkin for shading.

6. Paint the stem using the green paint. Add a line or two of orange paint on the stem.

7. Using small scissors, cut a simple triangle nose, eyes & mouth from the black card stock. Glue onto pumpkin face, and then glue the pumpkin onto black striped paper as in photo.